Connect to Data Tables
Establishing a connection with a data table enables your form to fetch items and views, or create new items in your database.
In Adaptive Documents, there are two levels of connections:
- at the document level - a table is connected to the entire document.
- at the element level - a table column is connected to an element of the document.
We shall discuss both these levels of connections in this article.
Document-Level Connections
At the document level, you can create two types of connections with data tables:
-
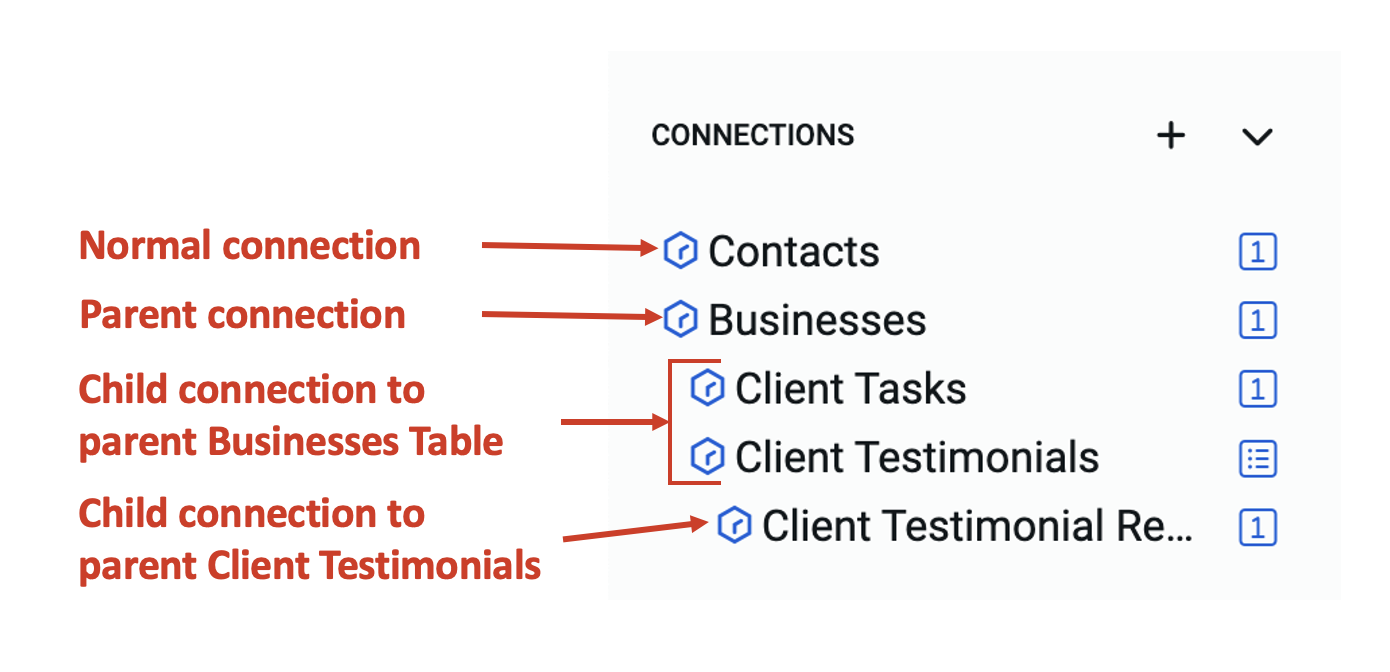
A normal connection to a data table has no conditions or dependencies.
-
A child connection to data table is based on dependencies from another table (called the parent table). For example, a connection with the Tasks table could have a child connection to the Employees table. This means the form can access can access information about any employees who are assigned a specific task.
There can be a nested relationship among table connections. This means a child connection can have further children defined.
Successful Document-Level Connections
When any connection (whether normal or child) is successfully created at the document level, then all the columns of the table(s) are available in the Element Picker. You can then add these input elements to the composition area and configure your Adaptive Document to interact with connected data tables.
Creating a Normal Connection
To create a normal or parent type of connection to a data table, consider the following steps:
-
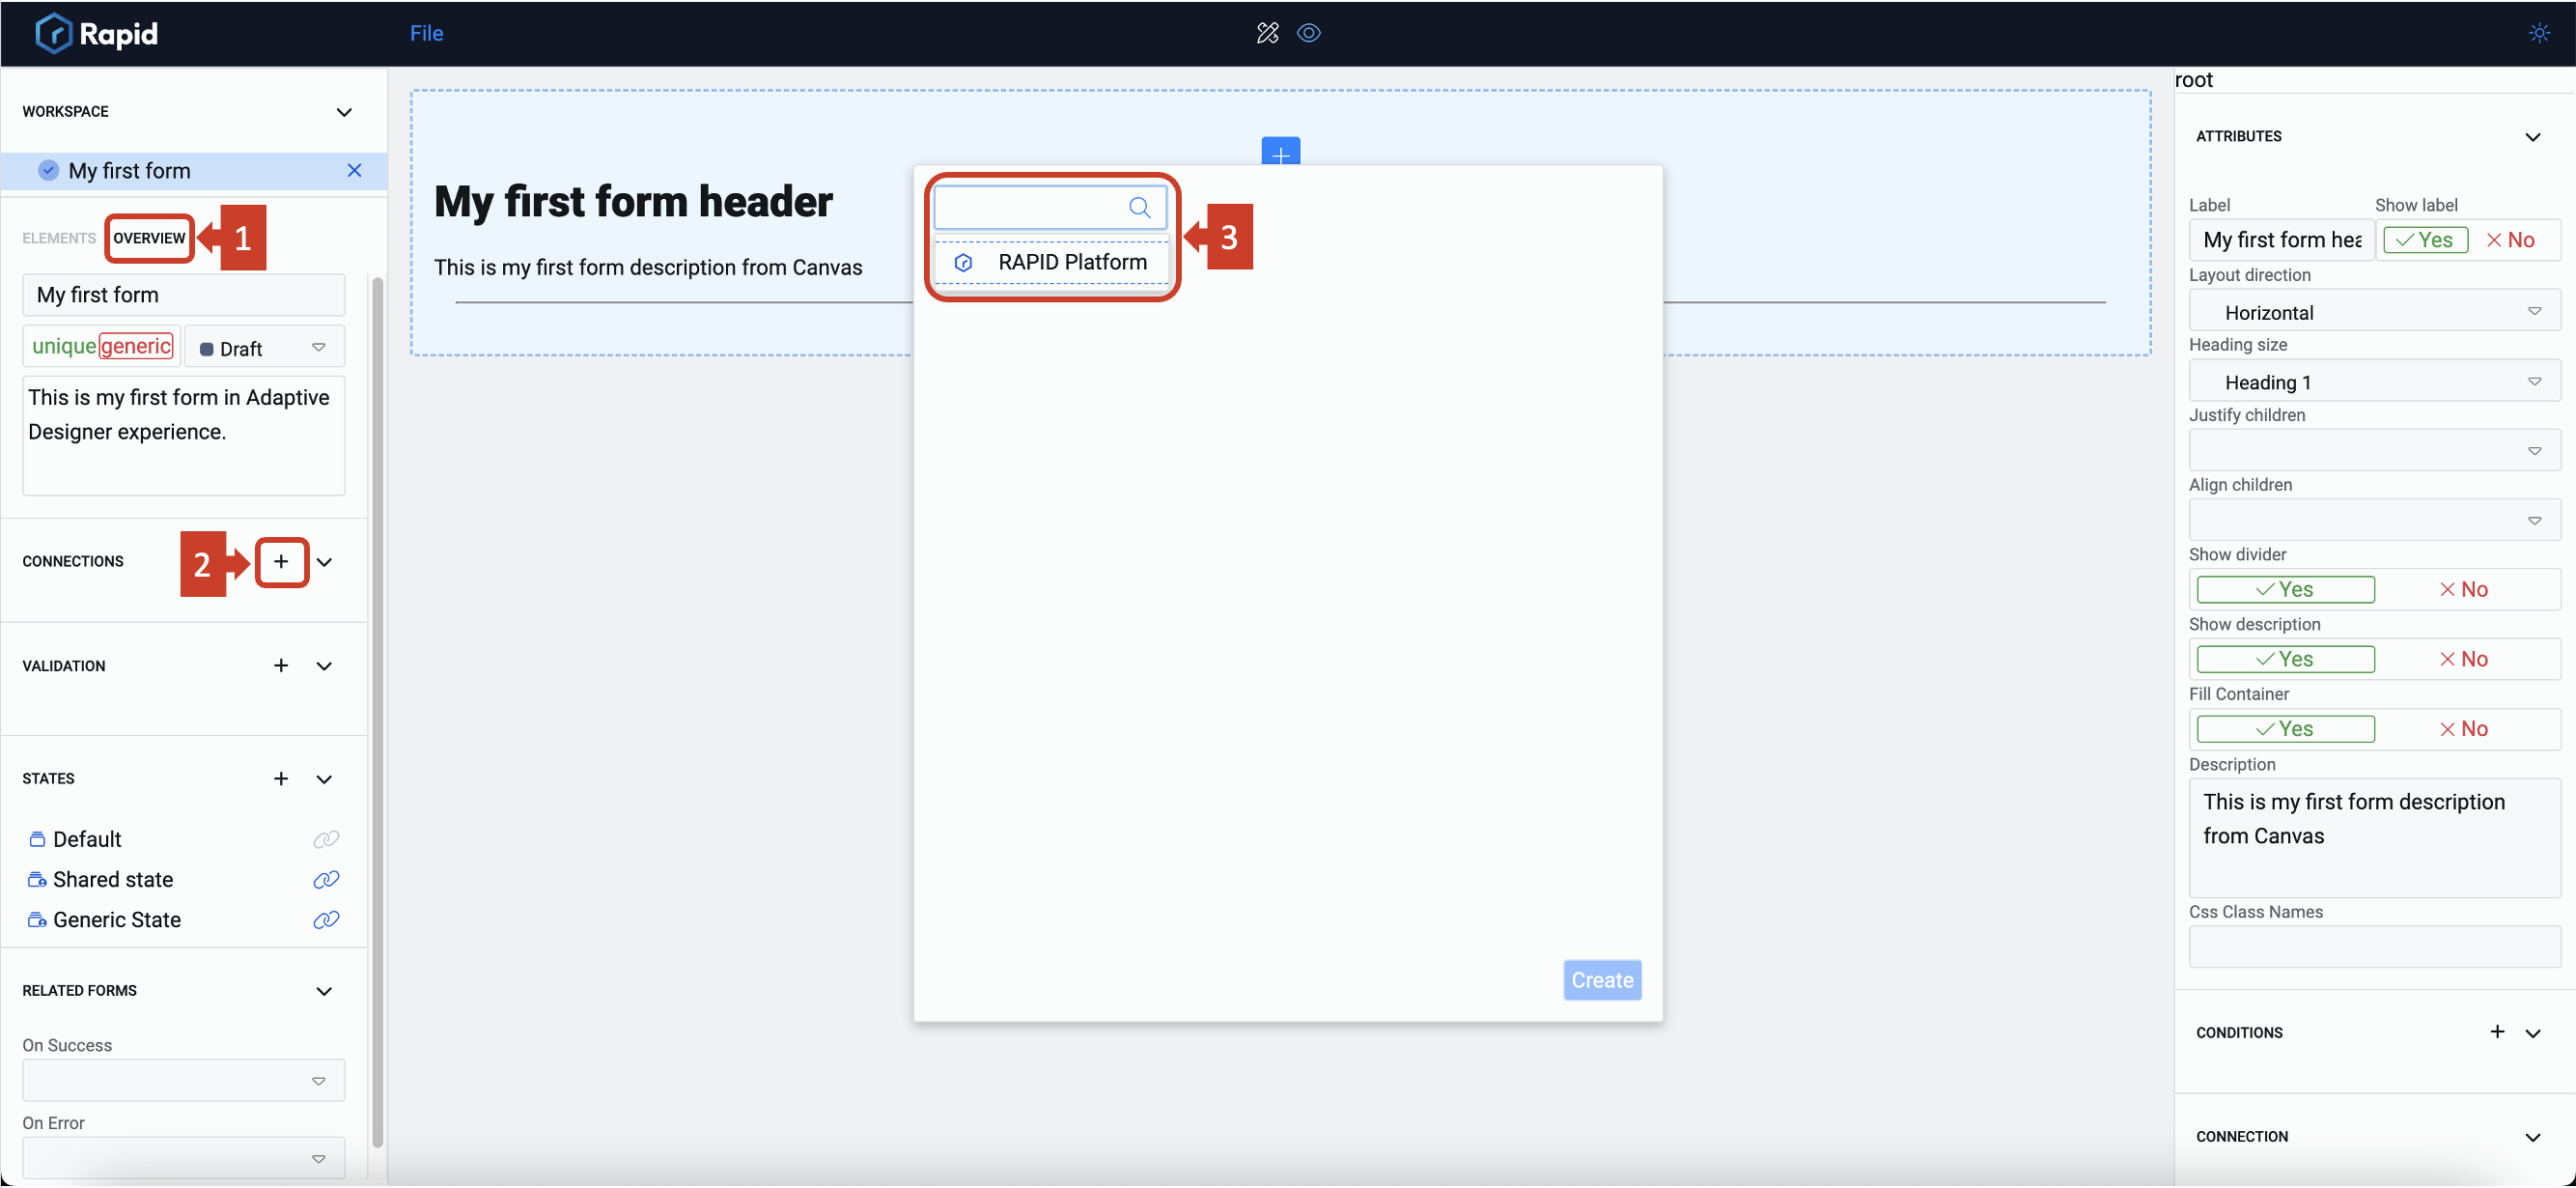
Select the Overview tab for the desired Adaptive Document.
-
Click on the + icon in the Connections section. This will open a connections panel in the middle of the screen.
-
Select "RAPID Platform" in the first field as source.
-
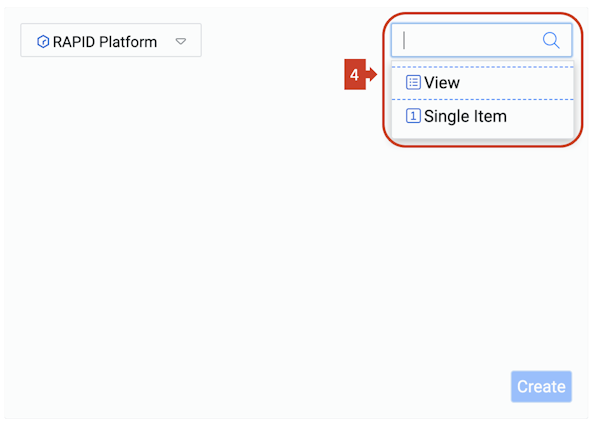
A new field appears. Select the method here. This defines the nature of connection. There are two options:
a. View connects the form to an array of items.
b. Single Item connects the form to a single item.
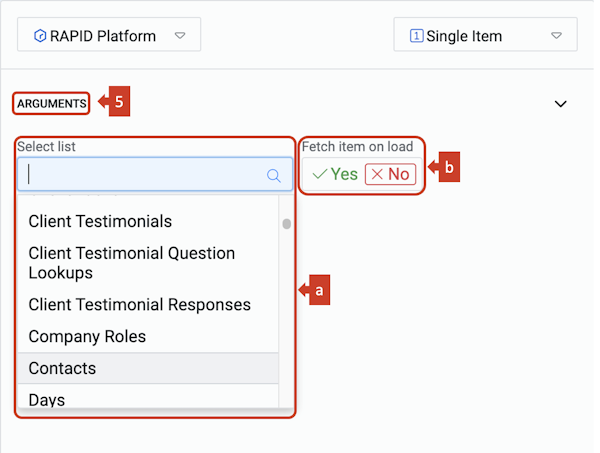
- A section of arguments will appear. This has two fields:
a. Select list where you must the relevant table to establish the connection.
b. Fetch on Load is a toggle field that allows the form to load item data and display it to users.
- Click Create
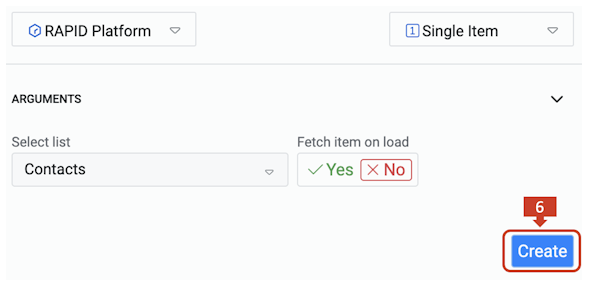
You now have a connection for the chosen table and will be able to pick its columns as elements from the element picker.
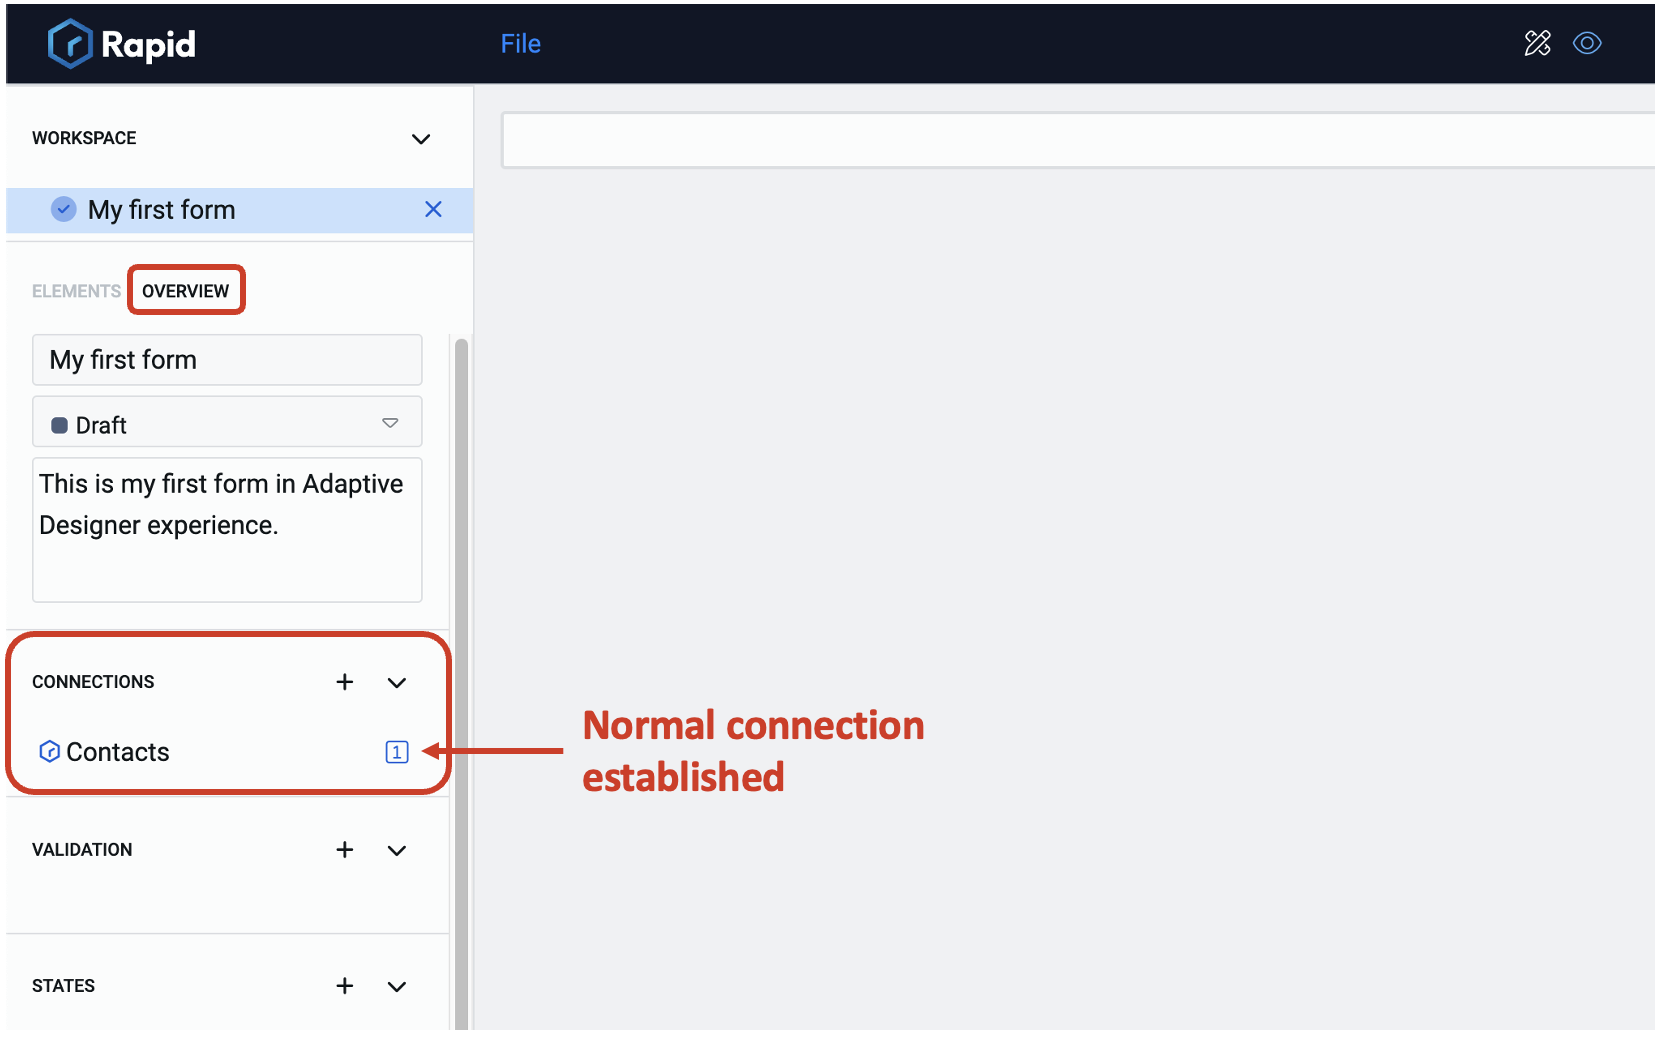
The connection will be visible in the Overview tab's Connections section. The title of the connection is the title of the table.
Be very careful while changing the table properties. If the table is a parent, it can break connection relationships. This will impact all associated element connections as well.
Creating Child Connections
To create a child connection under a parent connection:
-
In the Overview tab's Connections section, click on the title of the connection that you wish to be the parent.
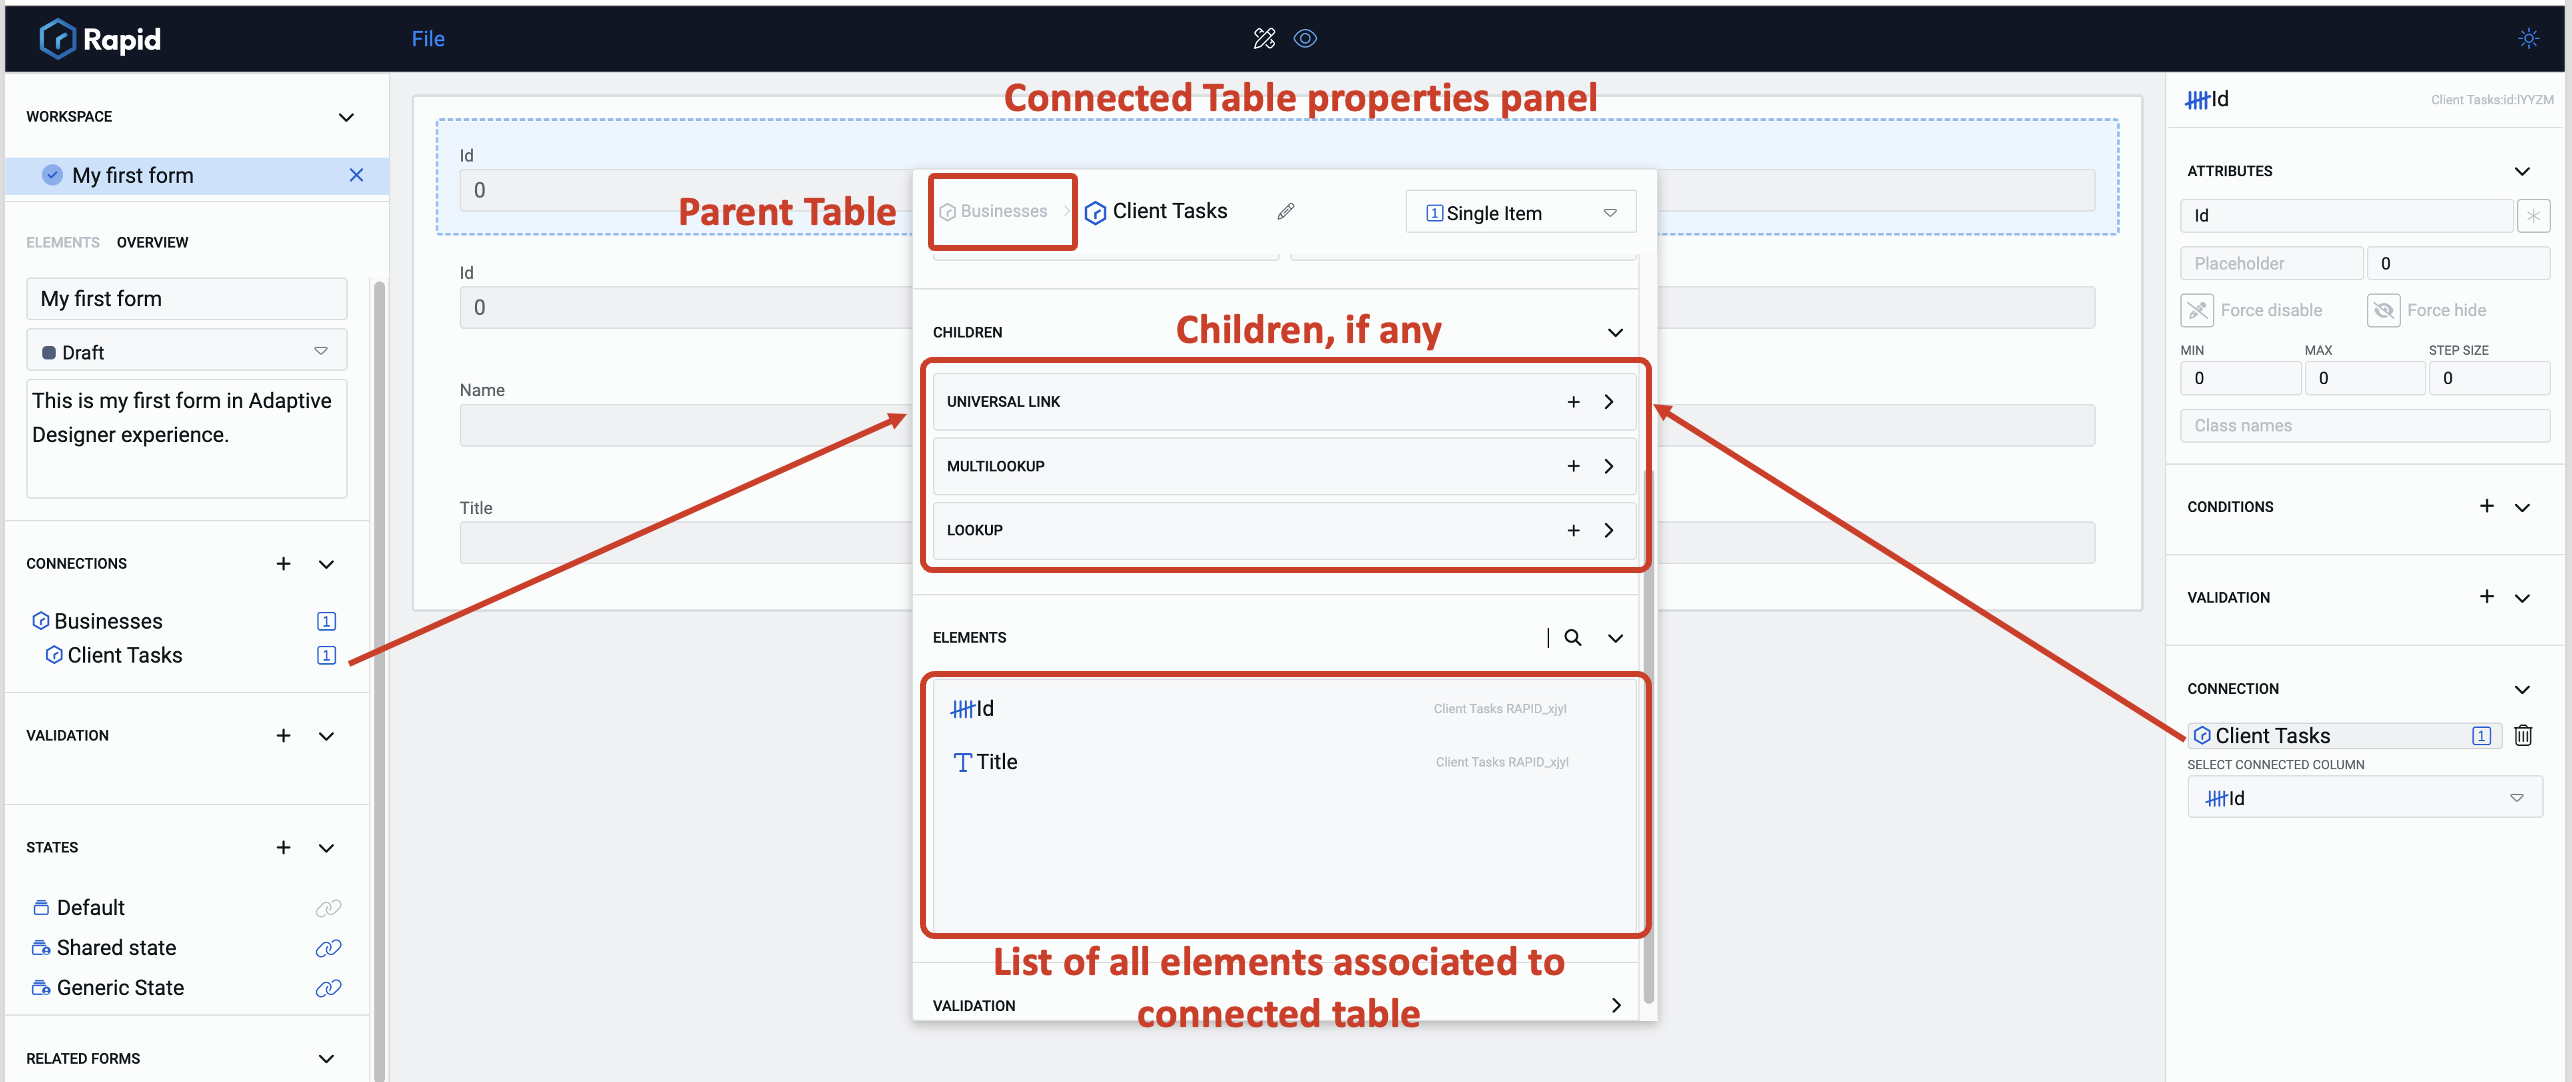
This will open a popup that displays the properties of the selected parent. This popup contains a Children section.
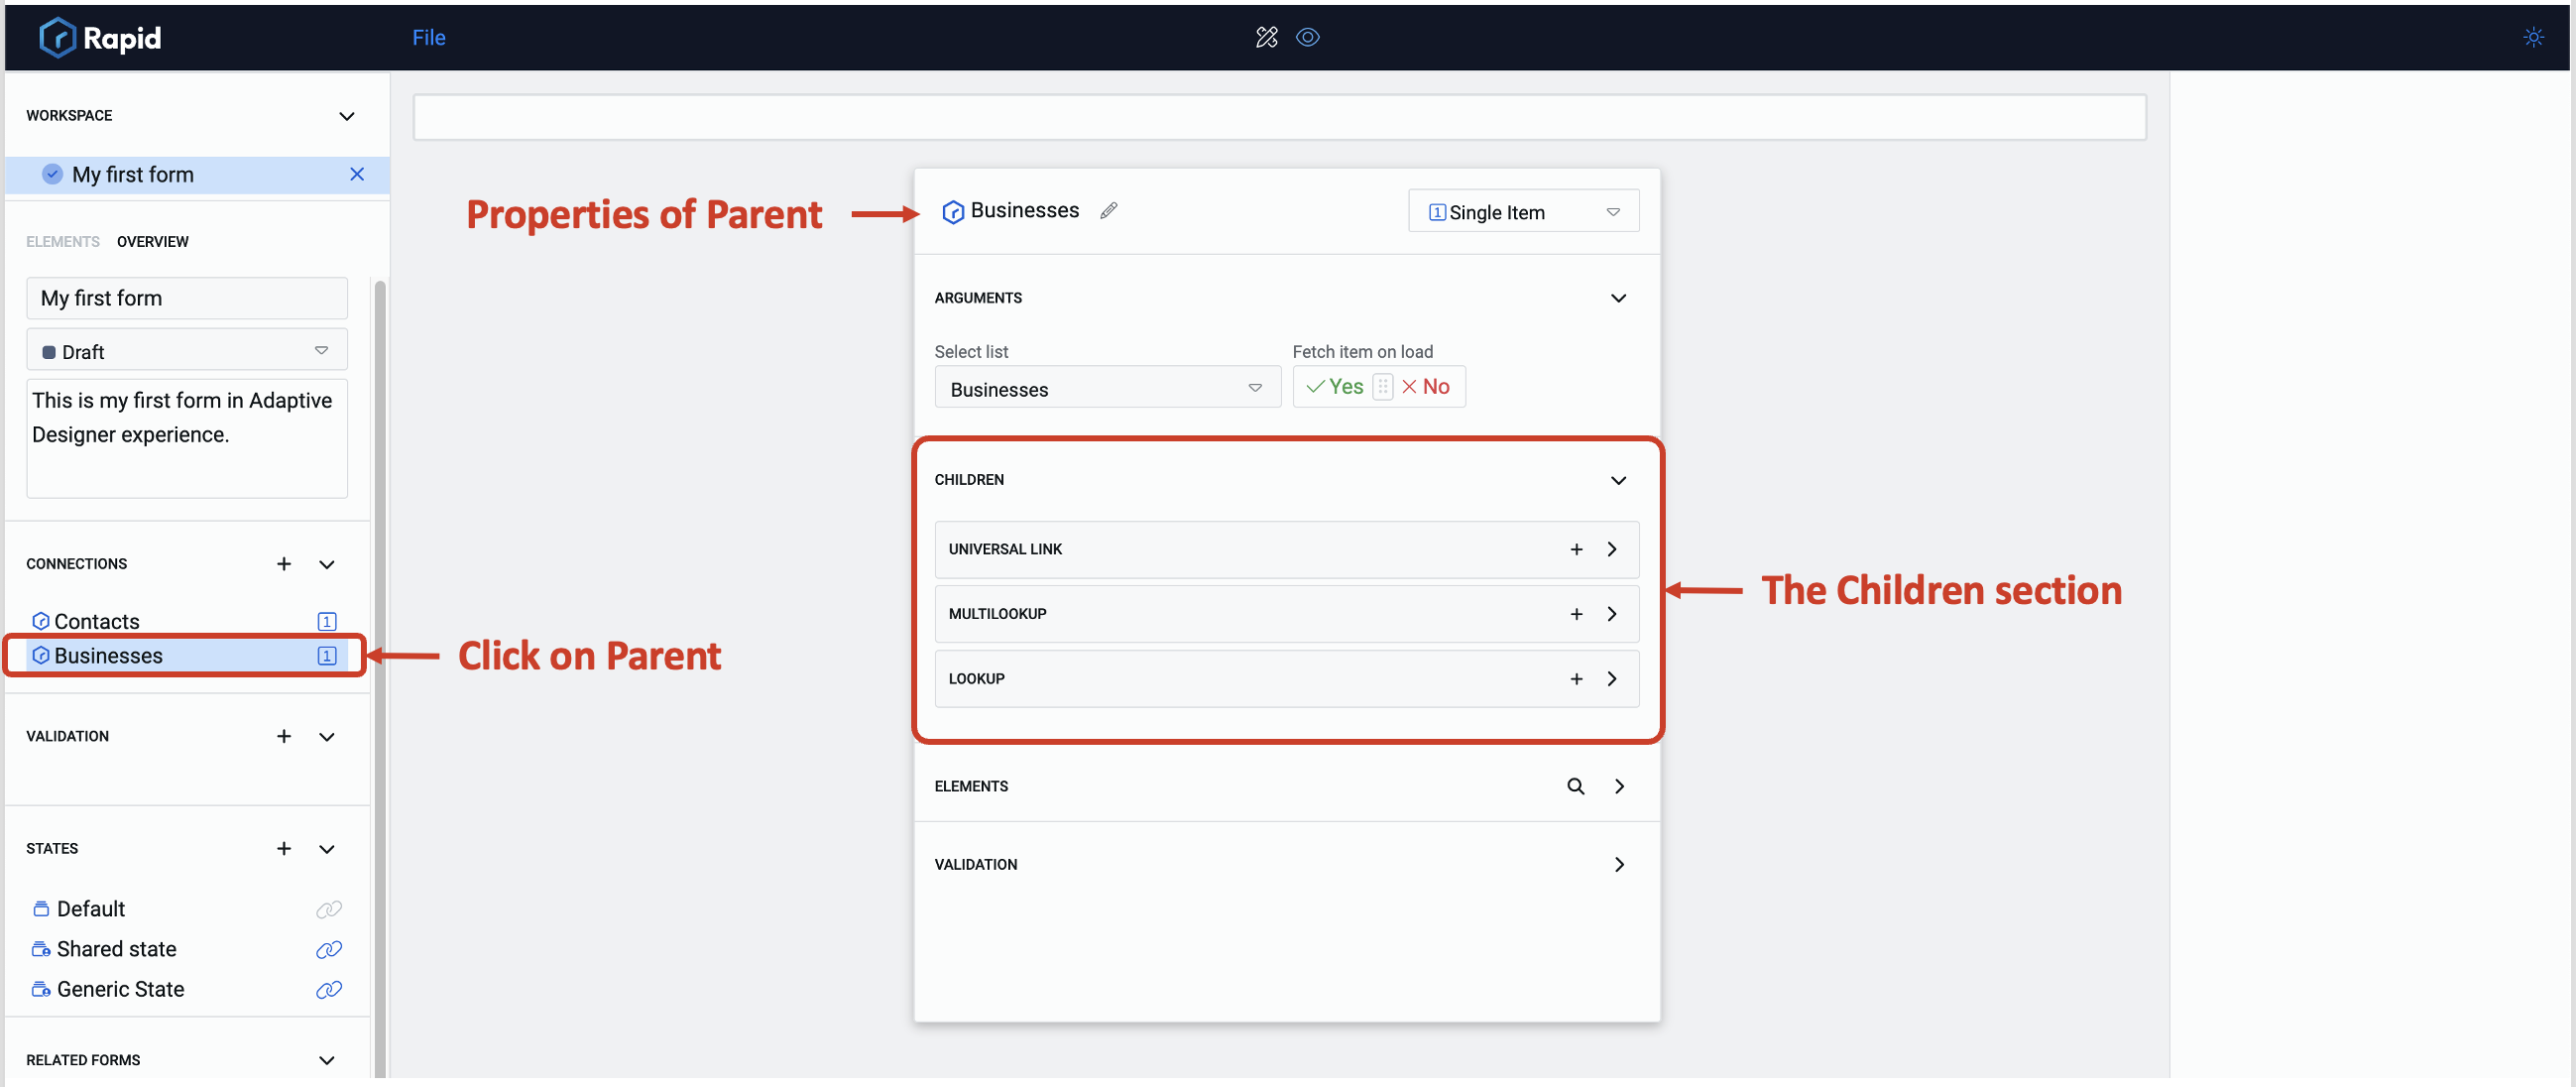 Children Connections
There are three types of children connections that can be created here.
Universal Link
This is a two-way link between the connecting tables' items. If the connection is established on Tasks Table > Task Assignee column, then the system will fetch any employee assigned to the specific task AND also can fetch all the tasks where the assignee is a specific employee. It thus becomes a two-way link and a many-to-many relationship.
Multilookup
This is a one-way link between the connecting tables' items. The form can fetch multiple child items connected to the parent item in the database. If the connection is established on Tasks Table > Task Assignee column, then the system can fetch all the Tasks where the assignee is a particular employee, but it cannot access employee details from the tasks table. Therefore, it is a one way, one-to-many relationship.
Lookup
This is a also one way link between the connecting tables' items and the system can only fetch a single child item that is connected to the parent. This is a one way, one-to-one relationship.
-
Click on one of the three options based on the type of child connection you wish to establish. This will open a section in the middle of the canvas.
-
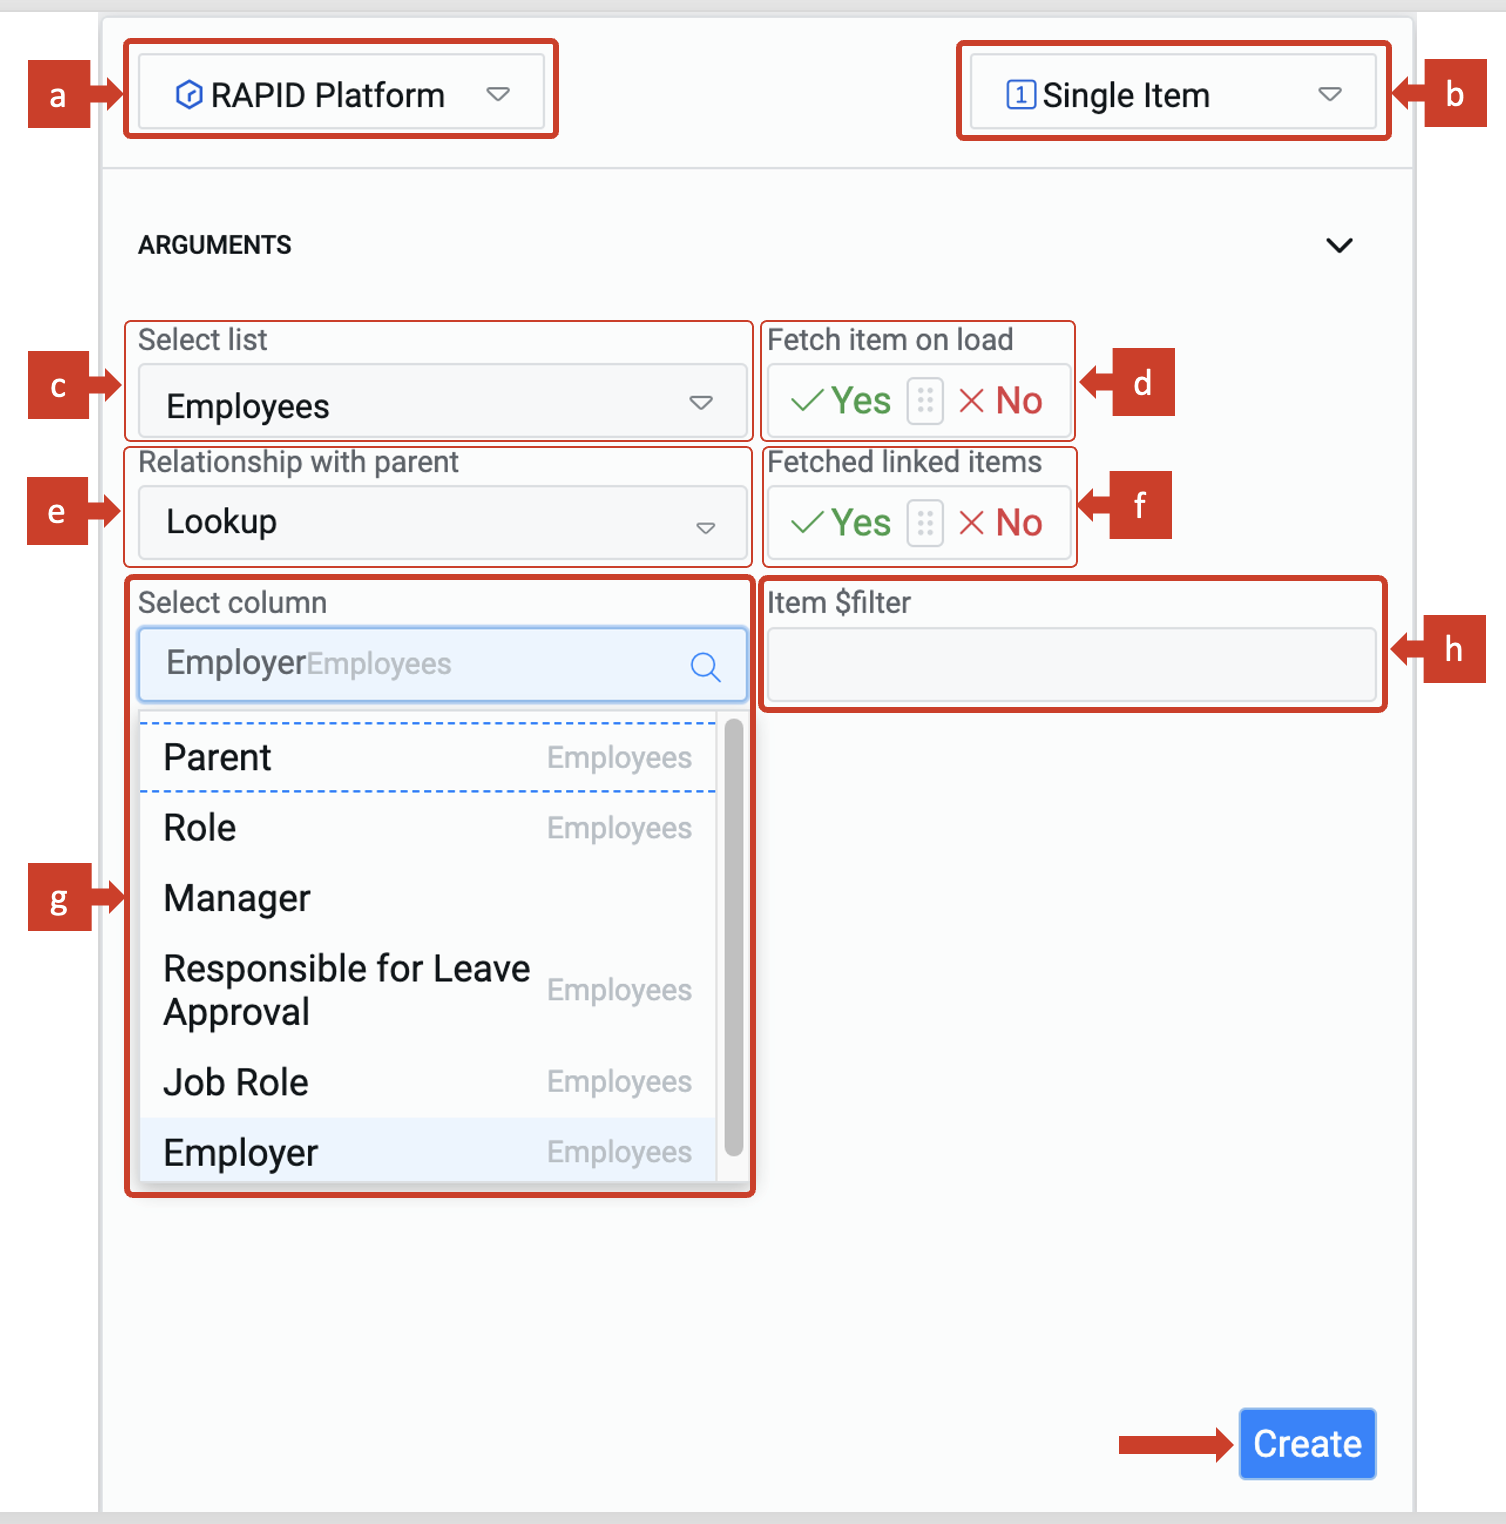
Enter the details which will define the behaviour of the child connection. Consider the following:
a. Source will be pre-selected here based on the parent.
b. Method defines the nature of connection. Select View (if you want an array of items) or Single Item. c. Select List chooses the table that you wish to connect as a child. This is a dropdown field with titles of all the tables from your site. d. Fetch item on load toggles whether you wish to pre-fill the form with data.
e. Relationship with parent is a dropdown field with three options:- Universal link
- MultiLookup
- Lookup
f. Fetched linked items toggles whether you wish to fetch item(s) linked to the table.
g. Select column
-
If the relationship with parent is selected as Lookup, then the dropdown in this field will show all the lookup columns on the table.
-
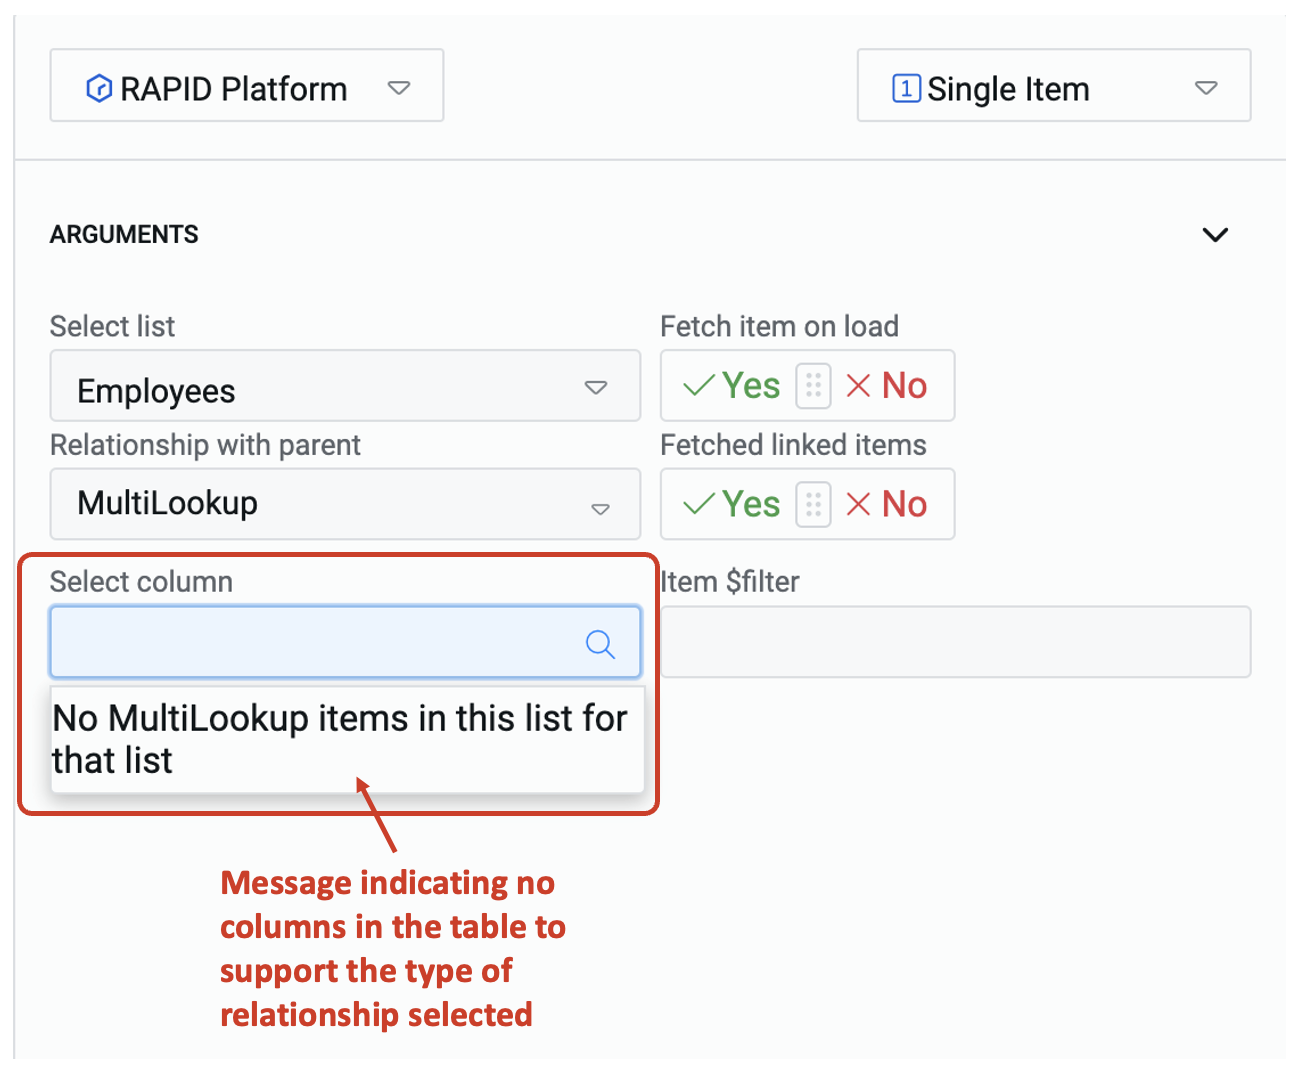
If the relationship with parent is selected as MultiLookup, then the dropdown in this field will show all the multilookup columns.
-
If the relationship with parent is selected as Universal Link, then this field will be disabled. As the system needs to fetch only the universally linked items, there is no need to select a column for connection.
Please noteIf there are no columns defined in the table that support the selected relationship, then you cannot establish that type of connection.
h. Item $filter provides an OData $filter query to prune the list of child items.
-
Click Create.
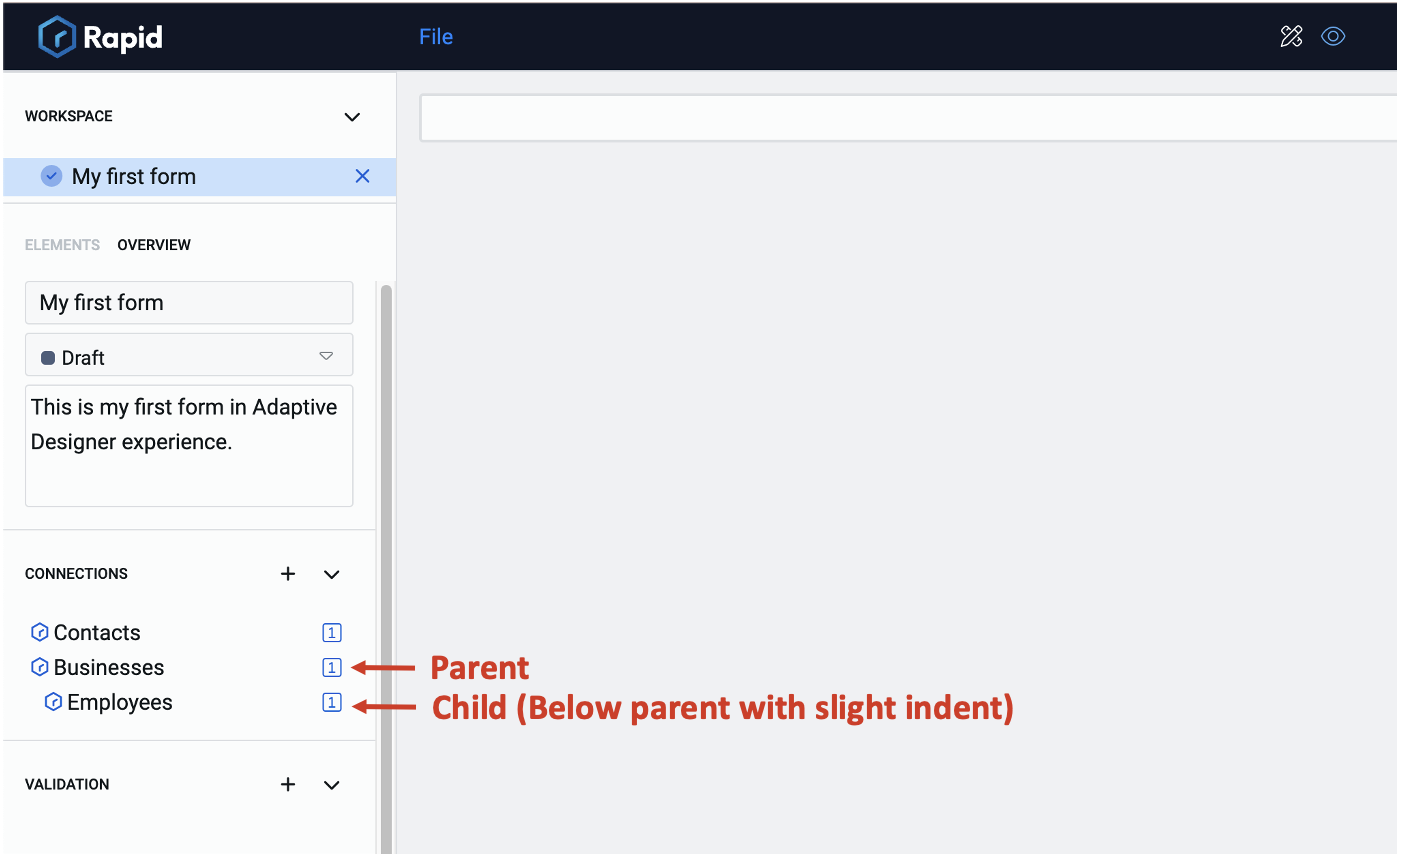
The child connection when created successfully will feature below the parent with a slight indent.
The Parent-child connections established in Adaptive Document can be different from the relationship existing between tables in Designer.
You need to be careful on selecting the column that establishes the connection, as it should logically connect the tables.
Element-Level Connections
The objective of establishing connections between an Adaptive Document and a Table is to ultimately be able to connect an item's field to an Adaptive Document's element.
While establishing Document level connection is the first step towards this, the objective is only achieved when the element is connected.
Connection Information
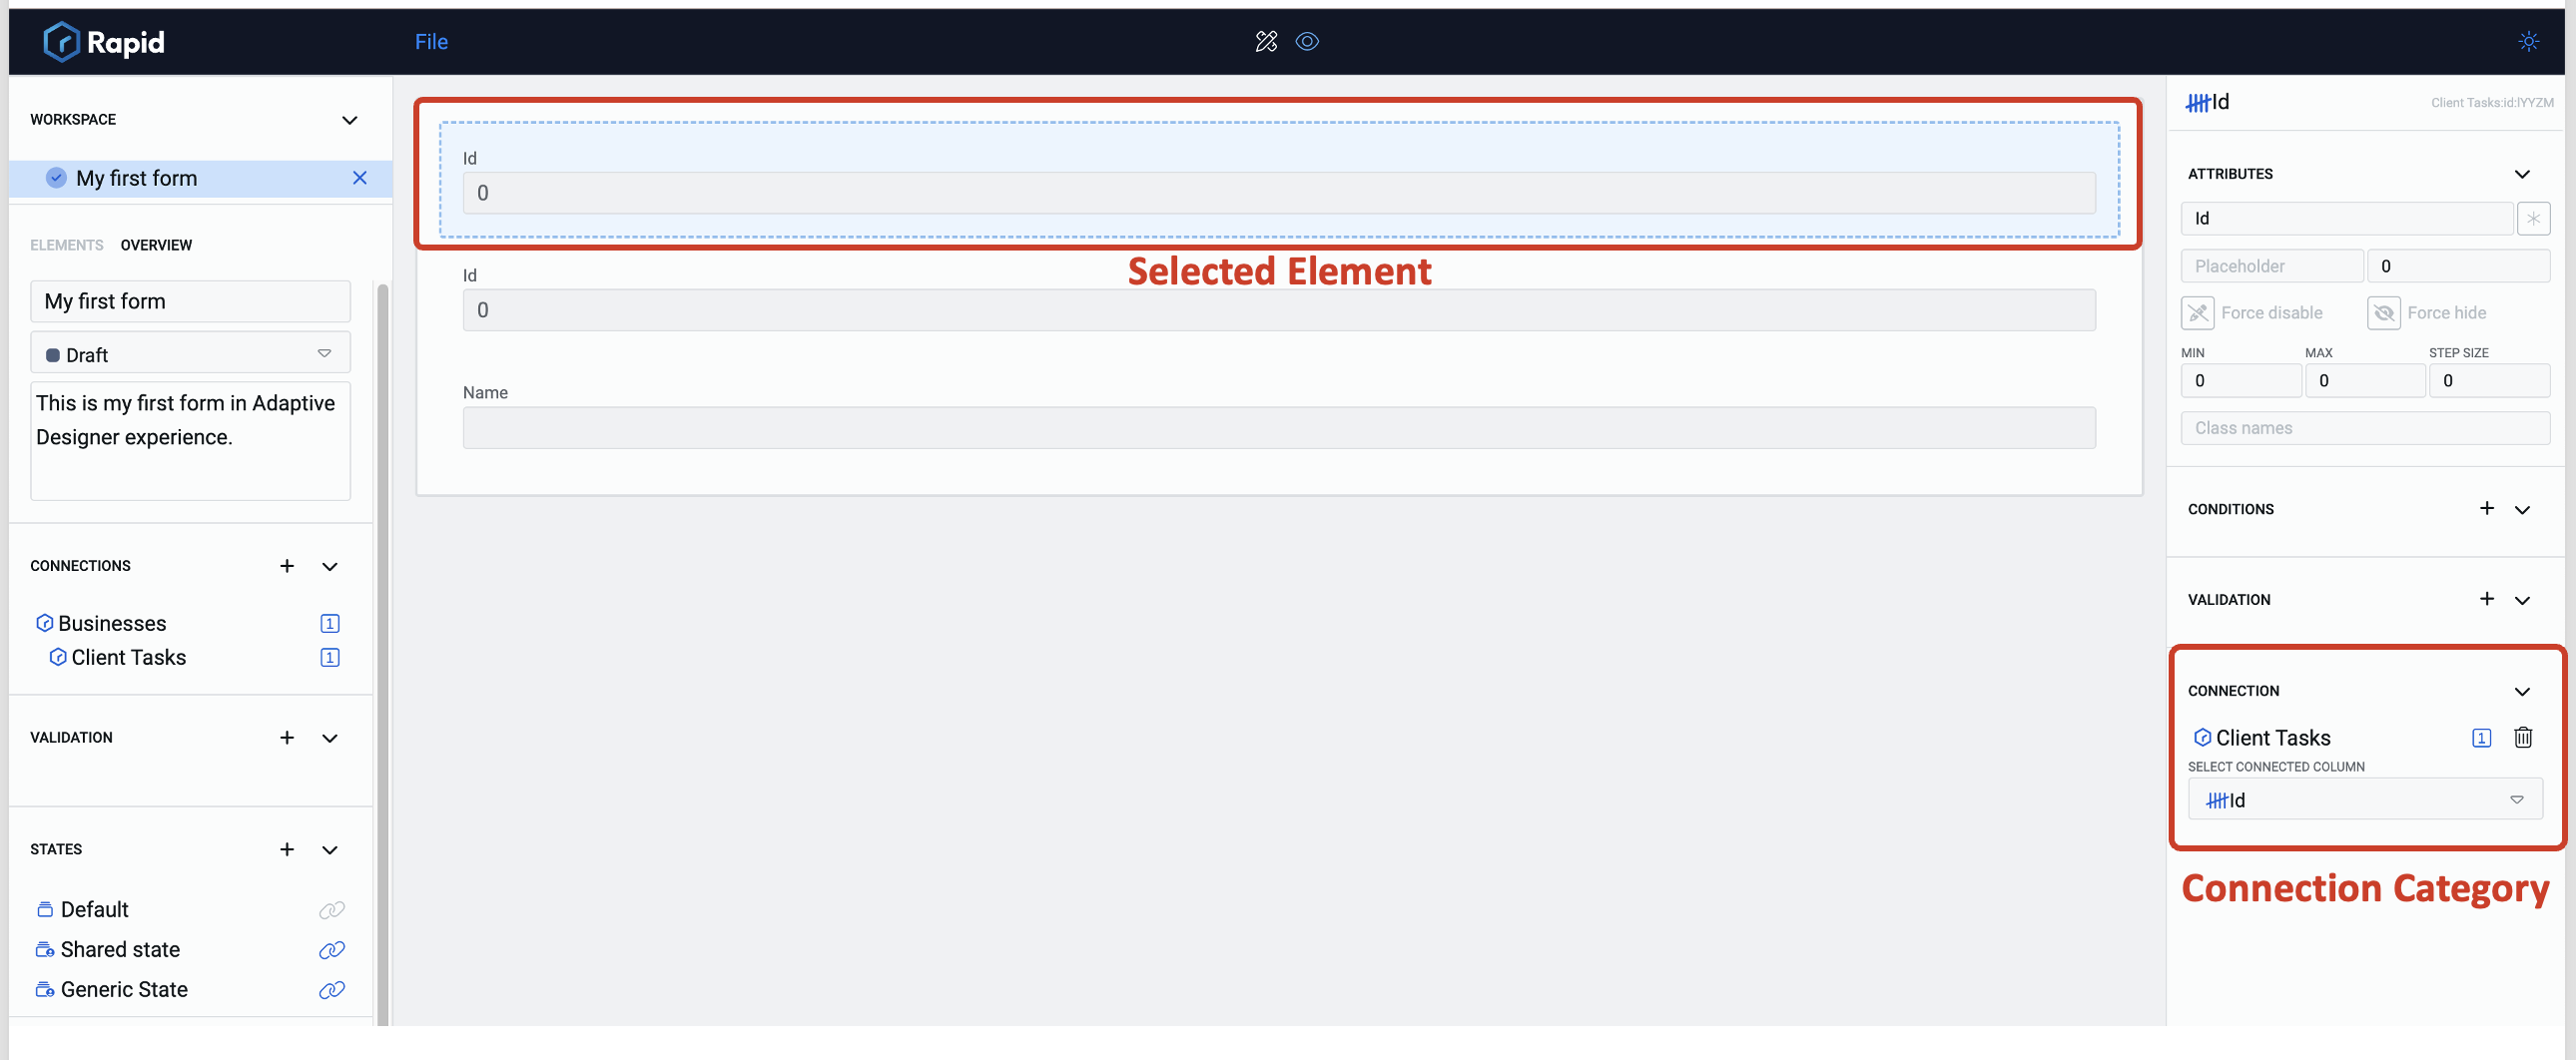
The connection attributes of the element can be accessed in the connection category of the element configuration panel.
Please note, this panel displays information about whichever element is selected. Ensure you select the correct element first.
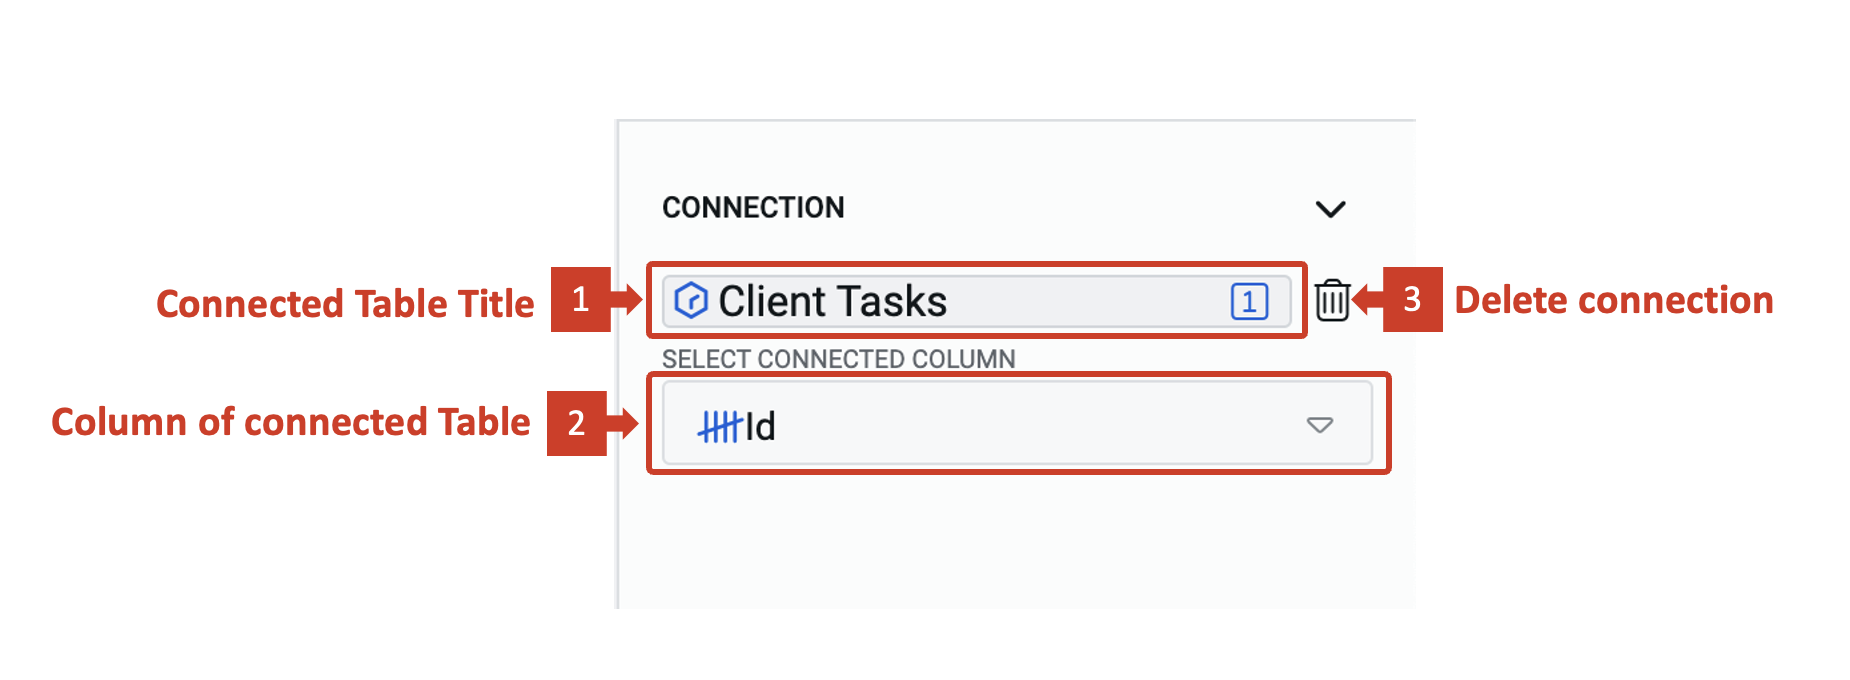
The connection category in the Element configuration panel displays information and allows you to edit the connection for a selected element.
-
Connected Table Title is the title of the table that is connected to this element.
Clicking on this field will open properties panel for the connected table again.
-
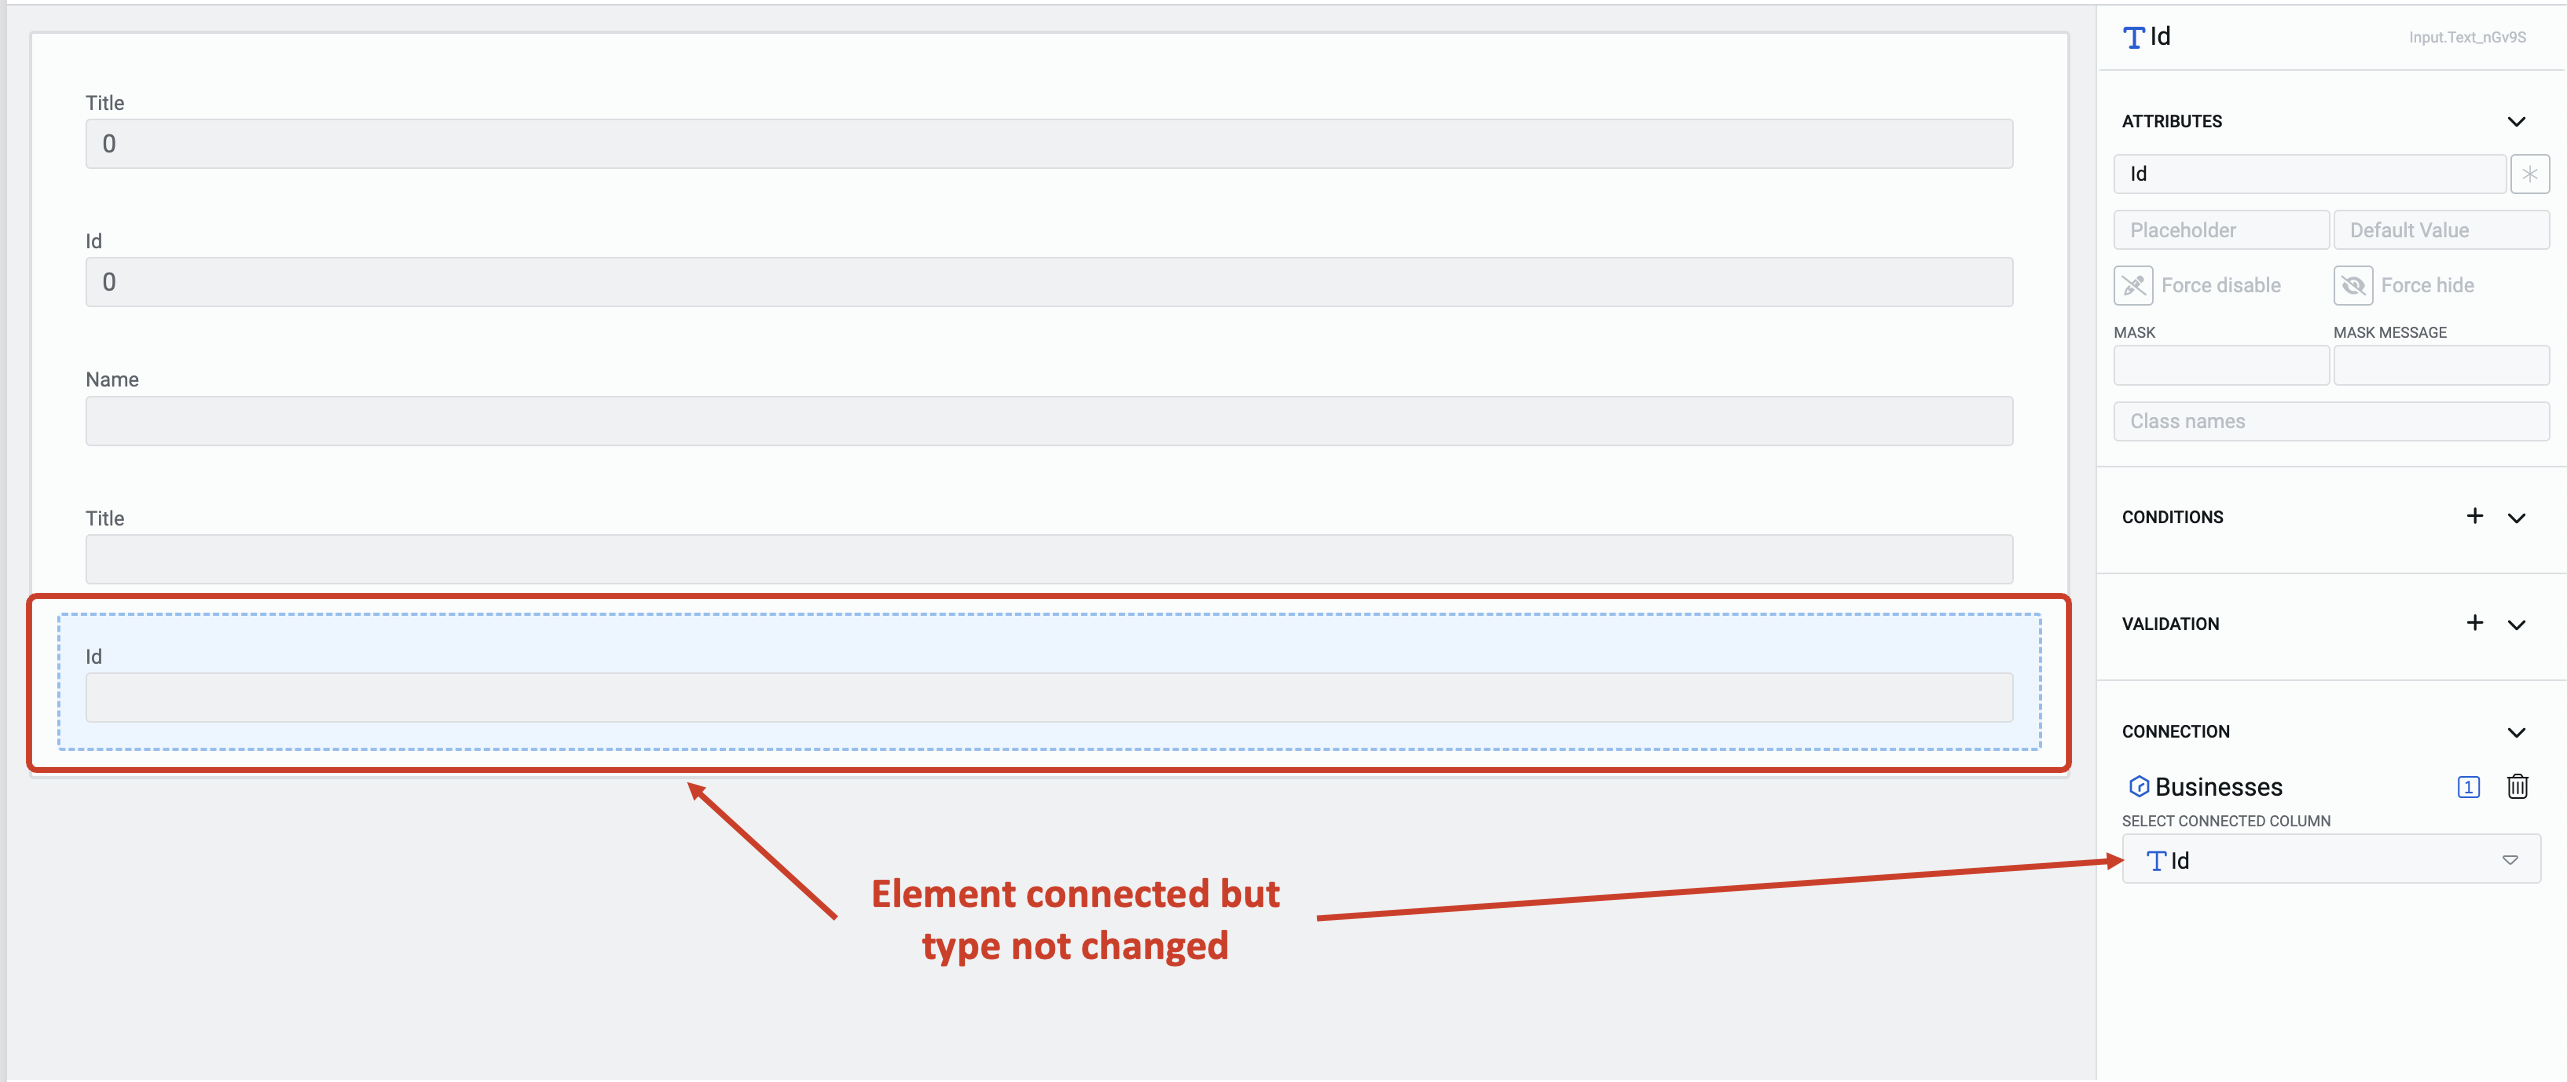
Column of Connected Table displays the database column or field that this element is connected to.
If you click on this field, a dropdown will open. This dropdown list contains all the columns associated to the connected table. You can select the column of your choice, and it will replace the element on the canvas.
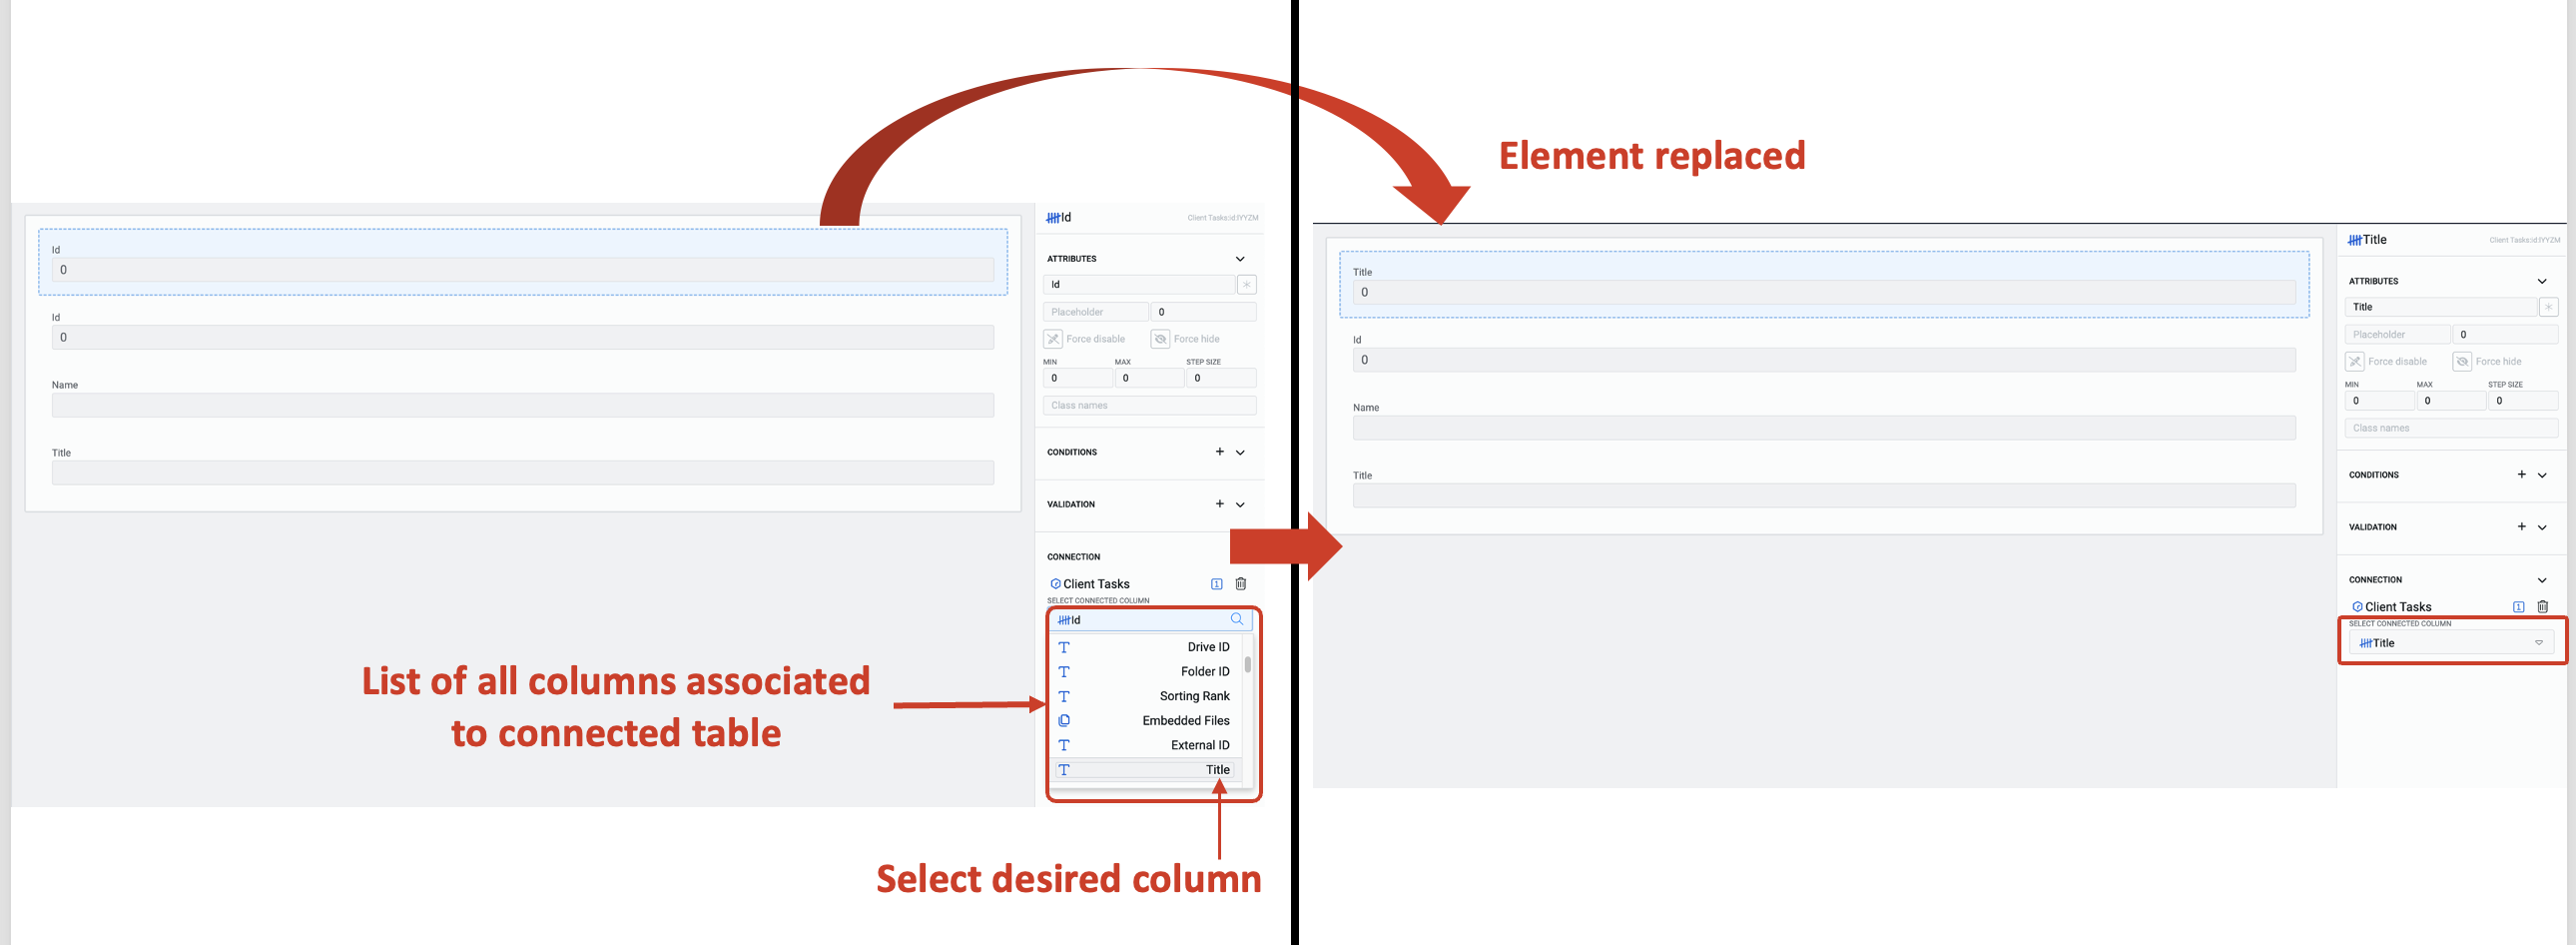 Please note
Changing the element like this will not change the type of the element.
If the initially connected element was an Id (i.e. a number) and it is changed to Title (i.e. text), the connection will occur but will cause errors.
Please only use this feature for elements of the same type.
-
Delete the connection
This only deletes the connection between the table and the element on the canvas. The table will remain connected at the document level, and the element will continue to exist on the canvas. However, the element will no longer be connected to the table.
Connecting Individual Elements to Tables
There are two ways to connect an element to a table:
-
Adding a connected element using the Element Picker

This method is preferable, because the element will be created with the connection already formed. The element type will also match the database column correctly.
-
Adding an element, and then associating it.
In this method, the element must be manually connected to the correct database table and column.
Please follow the below steps:
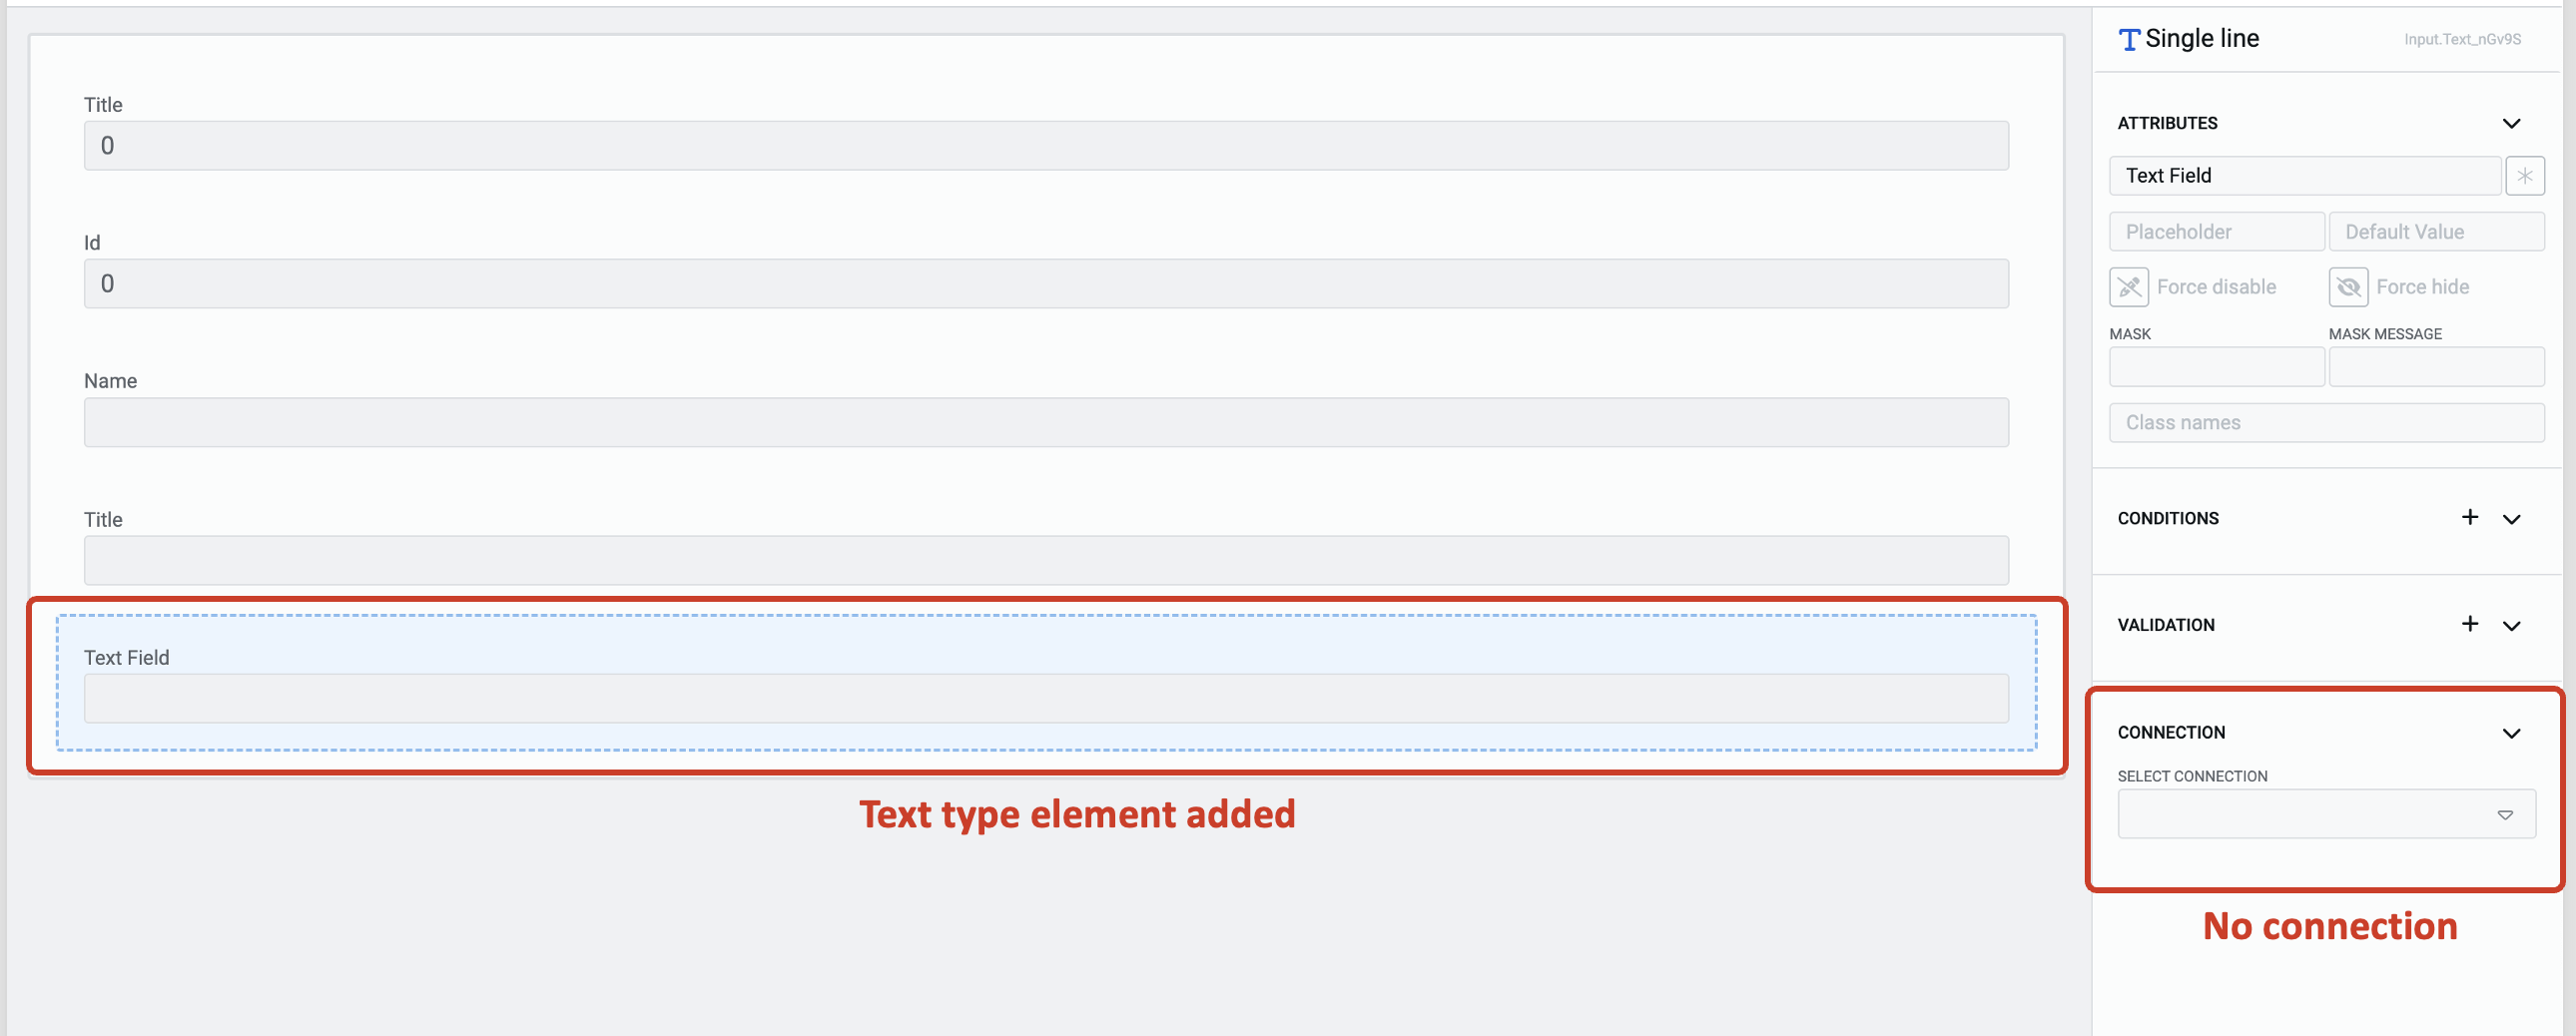
- Add an input control type of your choice from the Element Picker. For example - a Single Line text field.
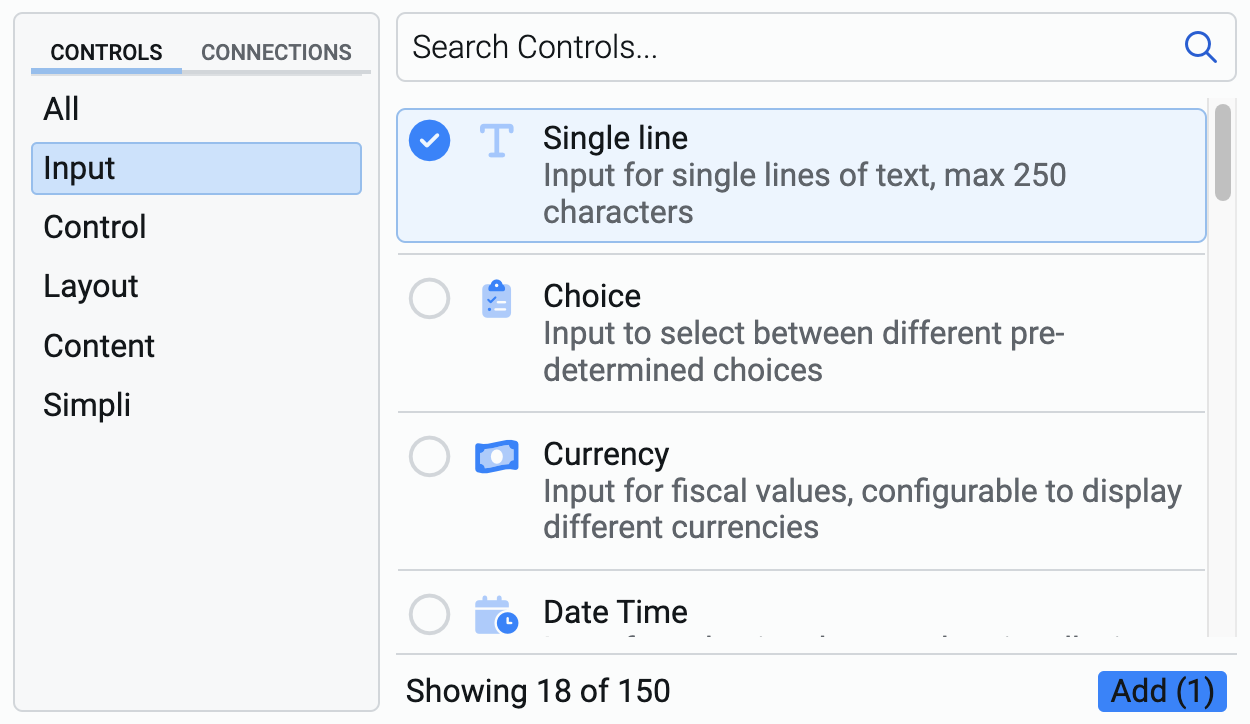
- Select the element on the composition area. Observe that the Connection category in the Element configuration panel does not show anything.
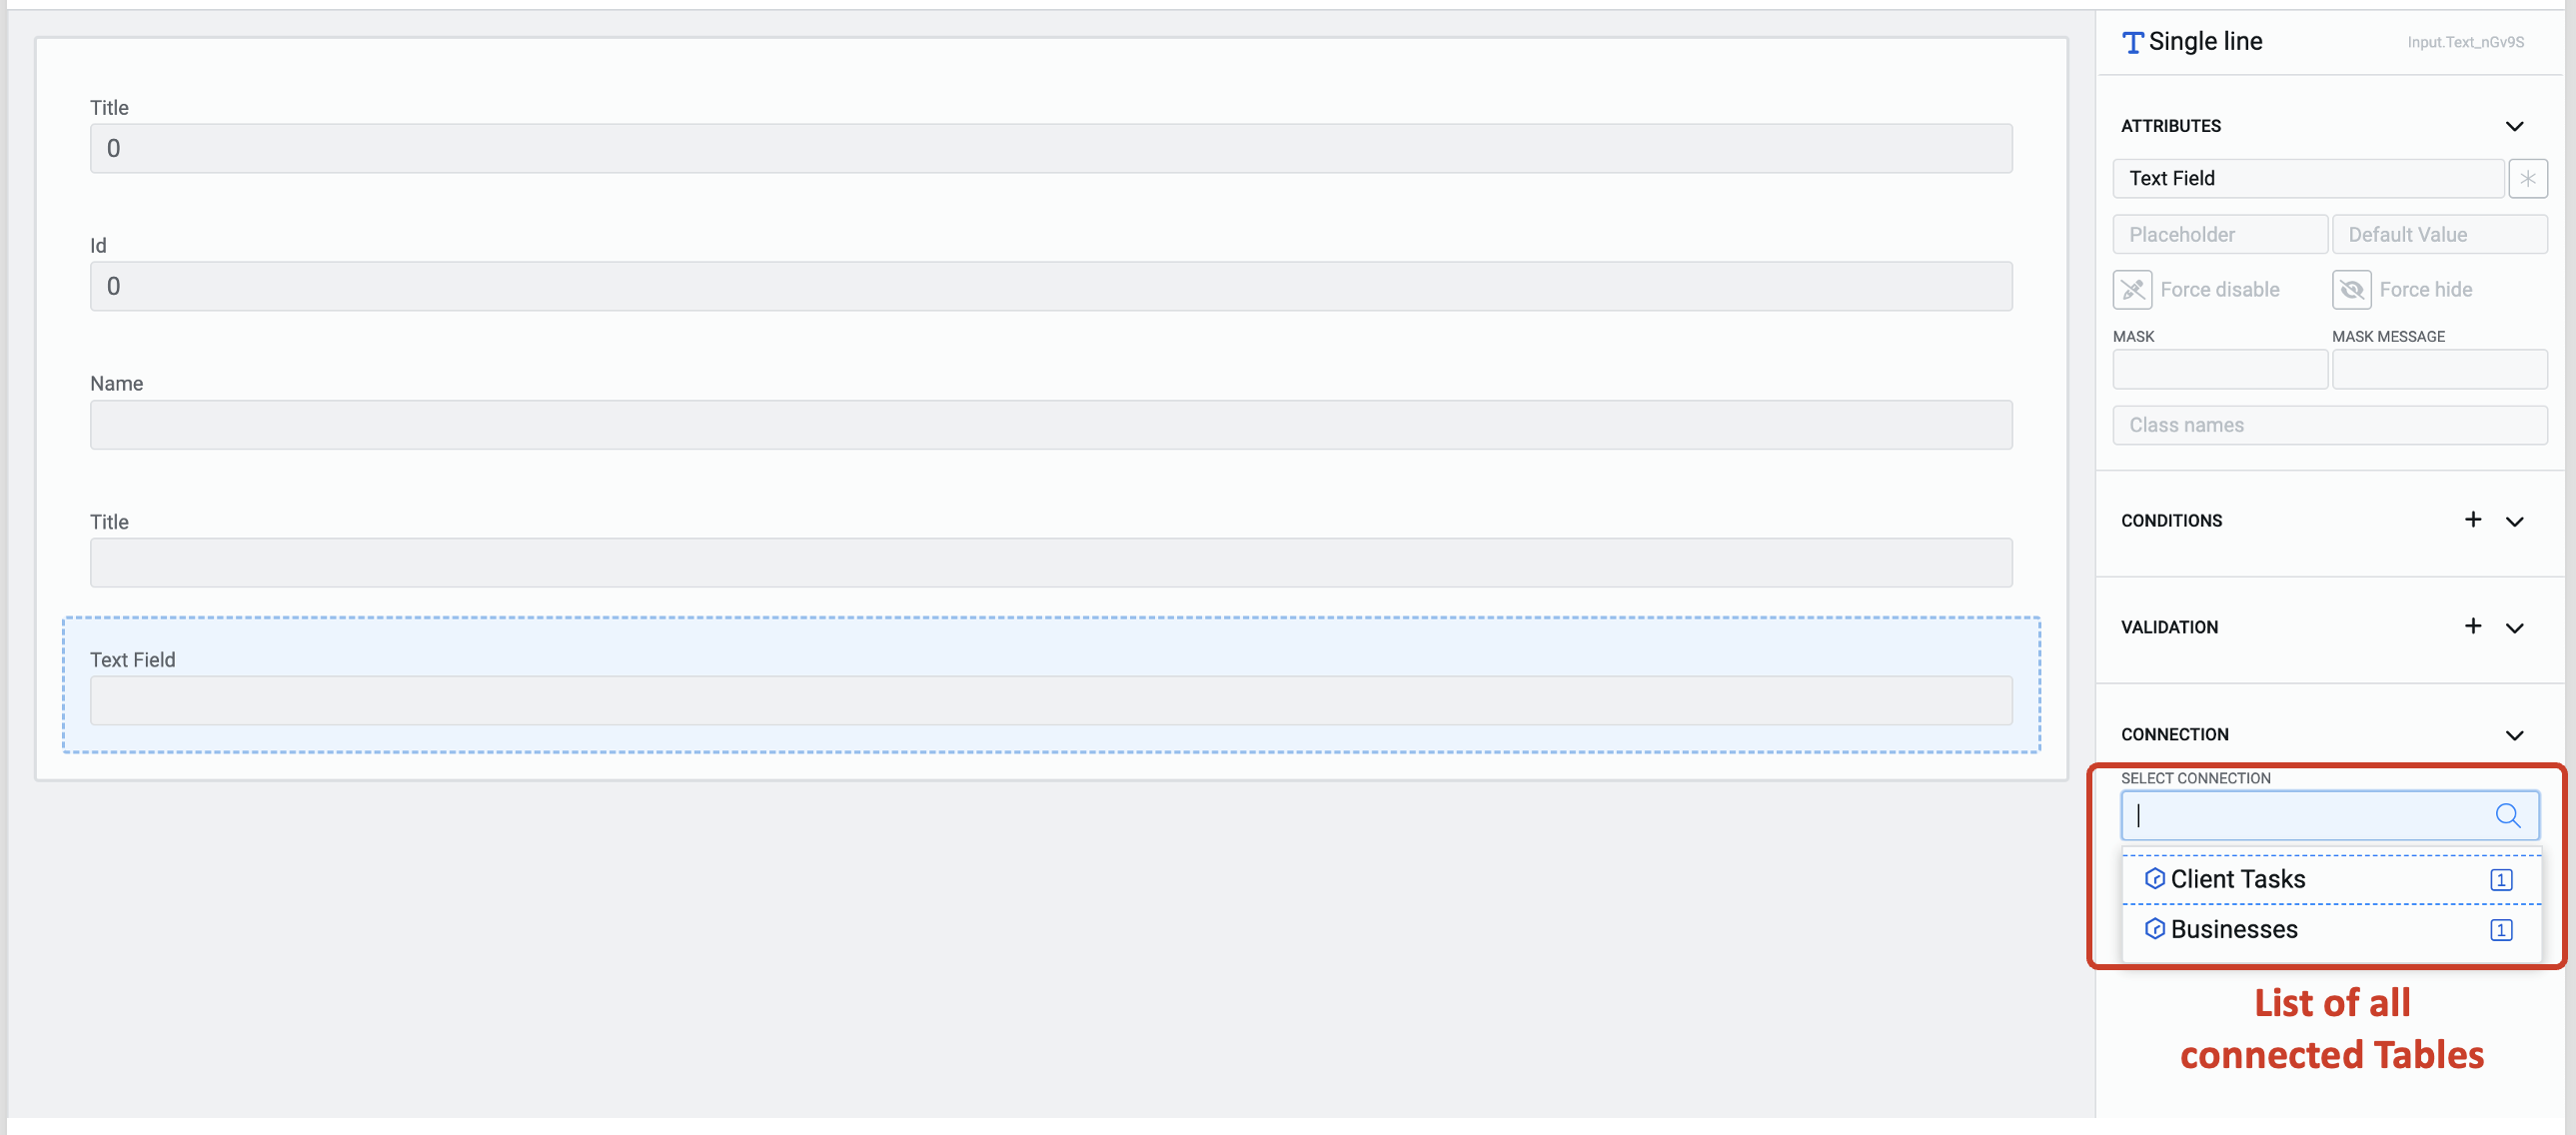
- Click on the Selection Connection field. This is a dropdown showing a list of all the tables connected at the document level. Select the table of your choice here.
- The title of the selected table will appear now and the field Select Connected Column appears. Click on it to reveal a dropdown list of all the columns associated with the selected table. Select the desired column from the dropdown.

- The element is now connected to the table.